Wednesday, November 19, 2014

Altered Wall Hanging

Double click any photo to zoom in for details.
Hi ya everyone!  I'm back with my weekly DT project for 
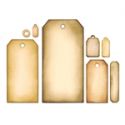
Frilly and Funkie.  We are kicking off a new challenge with Cec as our hostess.  This challenge is all about making something to give as a holiday gift.  It's the Frilly week to post, but I'm afraid I was leading toward my Funkie side when I made this.  I actually had a sweet, pink, girly project going for this challenge, but I had some problems with my distress ink colors turning to a different color so then nothing matched.  I ended up scrapping that project and going with this one.  Desperate for something to make as a gift, I headed to Hobby Lobby.  I found this in the wall art section for 50% off and paid $5 for it.  Basically it's a huge wooden tag 6x12" and came with the twine tie on top.
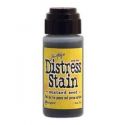
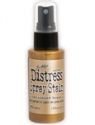
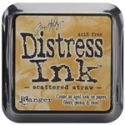
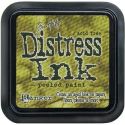
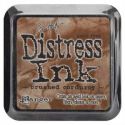
The first thing I did was gave it a coat of gesso, dried that with my heat tool and then gave it another coat of gesso.  I didn't want the original artwork to show through.  When that was dry, I gave it two coats of Pumice Stone distress paint, dried it with my heat tool again in between coats.  I had seen something with a chevron pattern at Hobby Lobby and wanted to re-create that.  I thought of using a stencil to add the chevron pattern, but I really don't care for the Tim Holtz Chevron stencil.  I do, however, love the Chevron Frameworks die and used it to create my own stencil.  I cut two of those die cuts out of acrylic packaging.  Doing two rows at at time, taping and masking off with masking tape, I stenciled on Mustard Seed Distress Paint.  I dried the paint in between each stenciling.  When all the stenciling was finished, I didn't like the way it looked - too bright plus the patten wasn't very crisp and clear.  I decided to knock down the color a little by sponging the entire piece, especially the yellow stenciling.  I used walnut stain distress ink.  I like the way it makes the distress paint look blotchy and worn - an instant hit with me!

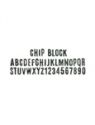
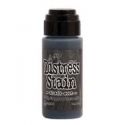
I used the Artistic Stacked Words decorative strip die to cut the number strip that I used for the stem.  It was cut from white CS because I'm almost out of black.  I sponged it liberally with Black Soot, applied black ultra fine embossing powder. and heated it on  The sentiment letters which were cut with the Chip Block decorative strip die started out as white CS and were also black heat embossed.
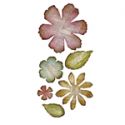
The flower is made from several layers of white CS cut with the Jumbo Tattered Florals Bigz die and the regular sized Tattered Florals die.  The layers were stained with Mustard Seed, spritzed with water, turned upside down on the craft sheet, scrunched, dried with a heat tool and sponged with Vintage Photo.  Once the flower was assembled,  I flicked a little black soot distress stain on it using a paint brush.

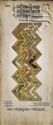
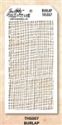
I included a couple of close up shots here because I wanted you to see the texture created by the distress paint.  With the Pumice Stone paint, it looks almost like woodgrain.  The Mustard Seed distress paint that I used to stencil was sort of stippled on using the foam dabber.  It gave it a raised texture and when dry, the Walnut Stain distress ink that I sponged on settled into the cracks and pores and gave the background such a nice rich texture.

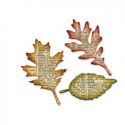
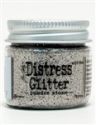
The leaves were cut with the Tattered Leaves die, painted with Pumice Stone distress paint, covered with Glossy Accents and then glittered with Pumice Stone distress glitter.

And even though it's not super frilly, I finally had a project I was happy with and felt I could share.  I think the photos really don't do it justice.  I really like the way it came out.  I'm not sure whose Christmas gift this will be but am leaning toward giving it to my daughter.  I think she will enjoy it hanging on the wall in her apartment.

Thanks so much for stopping by today.  I hope you will stop by Frilly and Funkie to see the other handmade gifts.


These products were used in the creation of the project above.  They are available at The Funkie Junkie Boutique where Ranger/Tim Holtz and most other name brand products are always 20% below MSRP.


Monday, November 17, 2014

Challenge: 12 Tags of Christmas - Funkie Junkie Style - Week #8

Click twice to zoom in for details.
Hello and welcome back to Week 8 of the 12 Tags of Christmas Funkie Junkie Style. It's hard to believe that we are already 2/3rds through this 12 week challenge!!  Before long, we will be bumping right up against Christmas!  Have you played along yet? If so, thank you so much and if not, what are you waiting for???  There are still 5 more weeks before the deadline of December 21st.  You can read about the challenge and the requirements in the Week #1 post.  

This week I have another homespun type of card - a hand knit stocking to share with you.  I really LOVE the new Tim Holtz holiday knit stencil and stamp set!  There is a coordinating Holiday Knit texture fade as well, but I did not use that here.  

As always, I started with one of the jumbo manila tags from my Funkie Junkie Boutique and embossed the Holiday Knit stencil with Tim Holtz Texture Paste.  When it was dry, I sprayed it with Peeled Paint spray distress stain and then gave it a couple of quick mists with the Tarnished Brass spray stain too.  (I am so hooked on Tarnished Brass spray!).  After drying the sprays with my heat tool, I went over the high points with Vintage Photo DI.  LOVE the way the background turned out.   That sprayed on Tarnished Brass adds so much!

Next I created the stocking.  The die has separate parts for the top and toes of the stocking.  I stamped them with Potting Soil archival ink and Wendy Vecchi's Reverse Dots background stamp.  The main body of the stocking was stamped with a stamp from the Holiday Knits set in Vermillion archival ink.    For dimension, I die cut a chipboard base for the stocking and glued the stamped pieces on top of it and then added some baby rick rack.  

Products to create this tag are available at The Funkie Junkie Boutique.
The sentiment is from Mini Holidays 5 stamped in Vermillion archival ink on a tag cut with the Thinlits tag die set.  I added three of the tiny bronze jingle bells and tied the on with some burlap string.  
My snowflake was cut with the new Paper Snowflake set from manila CS and edged with Vintage Photo DI.  I took the Holiday Knit stencil and stenciled on the styled flower right in the center of one of my snowflakes.  

And that's it for another week of Christmas inspiration.    I can't wait to see what you decided to make!


These products were used on the project above and can be purchased at The Funkie Junkie Boutique where Ranger/Tim Holtz and most other name brand products are always 20% below MSRP.


Saturday, November 15, 2014

Autumn Roads

Double click to zoom in for details on any photo.
Greetings friends and welcome to my new followers!  I guess I should have made a snowy roads project for this week's Artistic Outpost post, given that much of our country is already experiencing snow!  But I always feel like it's fall through Thanksgiving, maybe because I live in the south and don't get snow - LOL!  Anyway, I had an idea of making a leaf wreath from all the tiny leaves which can be cut with the Autumn Gatherings decorative strip die.  

I've always loved the Artistic Outpost set Home and thought it made a nice rustic background for my wreath.  I started with a jumbo manila tag and used Jet Black archival ink for my stamping.  Then the Tim Holtz Burlap stencil was used with Scattered Straw distress ink.  Spiced Marmalade and Vintage Photo DI were used on the edges.  
Products for project are available at The Funkie Junkie Boutique and can be accessed by clicking thumbnails below.  
A doily was cut from white card stock with a thin Prima die and colored by blending on a combination of Vintage Photo and Walnut Stain DI.  The leaves were also cut from white CS and stamped with Jet Black archival using several Artistic Outpost stamp sets including Whimsical Melange and Generation Redux.  Then several colors of distress ink were blended on including Rusty Hinge, Barn Door, Spiced Marmalade, Scattered Straw and Peeled Paint.  Then the leaves were misted with water, scrunched a bit and dried with a heat tool.  When dry, they were edged with Vintage Photo DI.  I cut a center panel with one of the new Tim Holtz label dies (back in stock on Wednesday!), which turned out to be a perfect fit for the doily.  It was stenciled with Brushed Corduory and the Tim Holtz woodgrain stencil.  The word Home was stamped with Potting Soil archival ink.
The tag was finished off with a little fall bundle of die cut sticks and wheat heads topped off with a small acorn that was stamped with the tiny text in the corner of the girl photo from the Generation Redux set.  It was colored with Vintage Photo and Crackle Accents was applied.  I added a tiny scrap of dyed seam binding that happened to be floating around on my craft table.

That's it for this week's Artistic Outpost make.  Hope you are having a great weekend!  Thanks so much for stopping by.


The products below were use to make the above tag.  They are all available at The Funkie Junkie Boutique where Tim Holtz/Ranger and most other name brand products are always 20% below MRSP.
Blog Widget by LinkWithin


I changed my font at thecutestblogontheblock.com