Showing posts with label Handmade Flowers. Show all posts

Sunday, October 30, 2011

Crinoline Chrysanthemum Tutorial

Hello,  I'm back with you today to share how to make this lovely fall chrysanthemum out of crinoline. 

Supplies Needed:
A piece of crinoline 3 inches x 35 inches or thereabouts (look for crinoline at your local sewing center.  If you can't find it, I have a limited amount in my Etsy shop)
Tim Holtz Tattered Florals Die
Cuttlebug Dandelion die
Dye (I used a couple of drops of SU Really Rust with a dash of Chocolate Chip to darken it a bit)
Glue (I use Beacon Fabri-Tac)
Something to hold it together  - a brad, a jewelry headpin (or you can glue it and put a decoration in the center such as a button or large rhinestone) 


#1 Cut the Crinoline
You will need 5 crinoline flowers cut with the next-to-largest flower on the Tattered Florals die and 5 cut from the Cuttlebug Dandelion die.  If you don't have these dies, substitute something similar (dies with long pointy petals will work best for this flower).
2.  Dye your cut crinoline - follow dying/drying Steps 2, 3 & 4 in the sunflower tutorial.

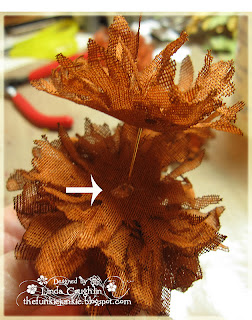
3.  Crumple each flower into a tight ball and then carefully unfurl them.  A petal may pull off here and there but that should not be a problem.  An occasional missing petal won't be noticed (arrows show where a couple of petals pulled off mine).  

3. Using a jewelry headpin or a brad, start adding your flower layers from the top down.  If you are using a button or a glue-on decoration for the center, it is easier to build from the bottom up as I showed in the sunflower tutorial.  When building on a head pin, I add all five of the smaller flower layers first and then separate while still on the headpin and add a bead of glue every other layer.


4.  Once you have all five layers added and the glue applied, push them up so all the layers are tightly compressed and using both hands, pinch the base of the flowers.  You may feel some glue oozing out as you pinch.  That's okay.  You should end up with a compact base while the upper petals are in tight bud.

5.  Now add all five of the larger flower layers and repeat the gluing process with a small bead of glue every other layer. 
6.  Push the remaining 5 layers all the way up so they are tightly compressed with the upper layers.  

If using a head pin, bend it to a 45 degree angle and add a drop of glue so the flower layers can't wiggle off.
I glue a small circle as a cover over the head pin and when dry, using a wire cutter, clip off the excess.

7.  All done - enjoy using your pretty fall flower on your fall crafting items.  A word of caution about using it for apparel, the stamping re-inkers are not color fast.  If you want to use it for apparel, I would advise using a color fast fabric dye and maybe sewing the layers together, although Beacon Fabri-Tac is made for gluing fabric.  
I hope you found this tutorial helpful.  If you have any questions, please post them in the comments section and I will respond to them at the bottom of this post so everyone benefits from the information.  

Sunday, October 23, 2011

Crinoline Sunflower Tutorial

If you are a regular visitor here, you know I'm crazy about making flowers out of crinoline. I already have two tutorials on making crinoline flowers (here and here), but have had many requests for the three fall flowers I have made recently. This first tutorial is for making this sunflower.   Soon to be published tutorials will be on marigolds and on chrysanthemums.  You can enlarge the photos to see the details by clicking once and make them larger by clicking a second time.


If you can't find crinoline at your local fabric center, I have a limited supply available in my Etsy boutique here.

You will need:
Tim Holtz Tattered Florals die
Tim Holtz Tattered Leaves die
Yellow dye or reinkers
Green dye or reinkers
Something brown for the center - I like a button and brown burlap string
A 20 inch by 4 inch piece of crinoline
A small square of canvas for the leaves
Rubber gloves

Let's get started:
1.  Cut 5 flowers from the crinoline using the second largest flower on the Tattered Florals die.

2.  Mix your dye solution.  If I am making just one or two flowers, I mix my dye solution on my craft sheet.  If I'm doing a batch, I use a shallow bowl.  Here I have misted my craft sheet with water and dropped 3 drops of yellow reinker.  (all of the smaller brown marks are stains on my sheet - please disregard :).


Mix the water and the dye.  Wearing a rubber glove, I mix it with my hand.

Add more water or more reinker to achieve the strength of color you desire.  I often mix colors to achieve the shade of color I want.
3. Saturate your crinoline flowers in the dye solution.  Here you can see I didn't have enough dye solution so I quickly misted more water and added a couple more drops of reinker to fully saturate and color the crinoline.

4.  Let your flowers dry.  They will dry in a couple of hours.  Alternately you can dry them with your heat tool but don't get it too close or you will scorch the crinoline.


5.  Once dry, the crinoline will be nice and crisp again.  To give your flowers body, crinkle them up into a ball and then GENTLY unfurl them again.  This particular flower on my Tattered Florals die has a weak petal at the base and it frequently rips/falls off, especially during this step.  No worries, one missing petal will not be missed on the finished flower.


6.  Because this flower doesn't have a brad or pin, I glue the layers together from the bottom up.  (The arrow is pointing to where one of the petals fell off this flower).  The glue I use is Fabri-Tac by Beacon Adhesives.  Buy it at Jo-Ann's with your 40% off coupon!  It is also the glue I use for making my cards - no warping like water-based glue does.


7.  Continue gluing layers until all 5 are stacked and glued.


8.  Add whatever center piece you wish


9.  I used the Tattered Leaves die to cut leaves out of canvas and dyed them with a green reinker.  They ravel a bit, but I like the shabby look.  I glue two leaves together in a cluster and then glue the sunflower on top. 

All finished - a beautiful crinoline sunflower ready to embellish a special project.  Warning:  If using as a clothing embellishment, please be aware that stamping inks are not color safe.

I hope you found this tutorial to be helpful. If you have any questions, please leave them in the comments section here.  I will update the post with the requested information/clarification so all will be informed.

Thanks so much for stopping by and for any comments you care to leave.


Post Updates:
Reader's Question - what reinker did I use?  Here I used Stampin' Up's Daffodil Delight.  Sometimes I add a hint of So Saffron or a really tiny bit of Pumpkin Pie to mellow it out a bit.
Reader's Question - where can I buy crinoline?  Try your local sewing center.  If they don't have it, I do sell it in my Etsy shop here.  You can also try buckram, which might be more readily available.  It is heavier and stiffer than crinoline and generally about twice as expensive.  

Saturday, September 10, 2011

Wonderful Windows


Good Saturday morning my blogging friends!  Hope your weekend is off to a great start.  I'm feeling rather poorly myself, having come down with a cold/flu type of deal on Friday so I'm hoping to be able to squeeze in a bit of rest this weekend - amongst my crafting and ministry work at church.

Our challenge this week at Our Creative Corner was set by our hostess Holly and is called Wonderful Windows. Wooeee, this was a tough one for me!  I'm not too fond of window cards because they are so fussy and take so long to make, not to mention how tough they are to photograph! That said, I am very happy with the results of my labor.   As you can see, I wanted to work in some yellow crinkled seam binding, but there was no room for a large floppy bow so I ended up weaving it in and out of the filigree metal.  I like the way it looks!

Details for the front of the card - Chocolate Chip outer shell, then a layer of whisper white stamped in Ranger Archival Black with a Tim Holtz (Christmas) music stamp then sponged with Scattered Straw and Vintage Photo.  The checkered paper is from Raspberry Roads but I changed the color from light blue to the garden green shade I had in mind to go with the sunflowers.
The window was cut with a Spellbinders label die and I used the music stamp plus an Artistic Outpost postcard stamp on the inside.  My sunflower was cut from crinoline with the Tim Holtz Tattered Florals die and dyed with Summer Sun reinker.  The leaves were cut from canvas with the Tim Holtz Tattered Leaves die and dyed with Garden Green reinker.  The ledger paper is also (digital) from Raspberry Road.  

I made up a little embellishment kit with the crinoline sunflowers and am offering it in my Etsy boutique.  I listed 5 but if they are sold out, come back later and I'll list more.  If you don't see them listed and are interested, email me at thefunkiejunkie@gmail.com and I'll let you know the availability of additional kits.

Thanks so much for stopping by today!  Hope you have a great weekend.

Challenges Entered:

Crafts and Me - Buttons and Bows
The Pixie Cottage - Mellow Yellow and/or Sketch
Truly Scrumptious - Decorate the Inside of Your Card

Saturday, July 23, 2011

All the B's!


Good morning and welcome back to my Saturday post for Our Creative Corner.  Hope you are all managing to find a spot to keep cool, especially those of you in areas where we are having record high temperatures.  I'm vacationing again in Key West, where it is hot and sometimes rainy, but usually have a nice breeze.  We plan to go bike riding today, but are waiting out a hopefully brief thunder shower.  

Our hostess this week is Sarah Gough who has set a clever challenge - All the B's - Buttons, Black, Bling and a Bow.  So dig into your stash for some fun bits and bobs.  Here's my take on the challenge.  I can't tell you the names of the sets because I forgot to take note of their names before I left on vacation.  I think the toile background stamp is Elements of Style from SU!  The Thanks is from Crafty Secrets and the frame under the flower is from WaltzingMouse.  For the white panel, I used an SU! border punch and embossing folder.  Spellbinders dies were used for the tag and the main panel.  The black flower was made from crinoine.  I die cut the flower pieces with the Tim Holtz Tattered Florals die and then dyed them black (very icky process, I must say).  The tulle was purchased black, not hand dyed by me.  I really like the way the black crinoline flowers came out and have made up a few more sets to sell in my shop.  I also put together the stick pin for a pop of color on this card.  The thread is burlap thread that I ussed to sew along the back of the panel to sew on the buttons and create the required bow for this piece.  

Hope you will hop over to Our Creative Corner to check out the rest of the samples by our lovely design team and then play along with us this week.  

That's about it.  Let me know if you have any questions.  Thanks so much for your encouraging comments.  

If you are interested, the following products are available in my Etsy shop:
Black crinoline flowers (oops, currently sold out - check back later!)
Crinoline to make your own shabby flowers
Stick pins
Burlap thread

Saturday, July 9, 2011

It's a White Party!

This week we have such a cool challenge at Our Creative Corner.  Our hostess is Kristin Tierney and she is challenging us to use only white in our creation this week.  Don't worry that it will look flat.  You can enhance it with textures and patterns.  Here is an inspiration photo to get you started.


I decided to make a wall hanging instead of a card this week. (don't forget, if you click once on the photo of my wallhanging, it will open up a larger version so you can see the details.  Click again and it becomes even larger. )  I started with a square 12x12" cream colored doily and cut 3 of the 4 corners off, then reattached one of the corners to the top of my piece.  I mounted the doily on a piece of white card stock.  I wanted to mount the piece on corrugated cardboard but it needed to be white so I painted it completely with white acrylic paint.  The corrugated cardboard I sell in my Etsy shop is flexible and lightweight so I mounted it on a piece of cardboard for strength and stability. 
 

The lace and applique were dyed in a very weak tea solution, to just give them an ivory tint.  The crinoline for the flower was dyed in a tea solution also, just a bit stronger than the lace.  

I added a Spellbinders die cut, a sentiment panel and a piece of bronze metal that I white embossed.  I also embossed the large metal filigree at the bottom.  It was originally bright brass.
I turned it upside down and smooshed it into a craft white ink pad and then embossed it with white embossing powder.  

I love the enameled look that the embossing powder gives.  

That about wraps up the details for this piece.  If you have any questions, please either leave them in the comments or email me privately.  Thanks so much for dropping by and for your lovely comments.  And be sure to stop by Our Creative Corner to see the rest of the team's cards.  Hope you will play along with us this week!

NOTE:  The following items can be purchased in my Etsy shop:


Challenges Entered:
Try it on Tuesday - Flower Power
ABC Challenge - Y is for Yesterday
Charisma Cardz Challenge -  It's All About Flowers
Cute Card Thursday - Lace
Crafty Catz Weekly Challenge - A Vintage Look

Monday, July 4, 2011

With a Flourish


I'm back again today to show you my sample for this week's Simon Says Stamp and Show challenge.  This week we want you to show us flourishes.  Since I was trying to get all my projects finished before we left Friday morning for a few days in Key West, I opted to make a simple tag for the flourish challenge.  I used the Tim Holtz Flourish mask on a manilla tag and misted it with a mixture of Vintage Photo distress ink, Heirloom Gold Perfect Pearls and water.  The tag and sentiment frame were cut with the Tim Holtz tag die.  The shabby flower was made with tea dyed crinoline and tulle cut with the Tim Holtz Tattered Florals die.   Everything here is in vintage photo tones except a bit of misted stamping with Weathered Wood distress ink and the Flights of Fancy set.  The sentiment is from the Mini Classics set.  Plus I stamped the sentiment with Weathered Wood and used it to dye my crinkled seam binding. 


Hope you will play along with us this week.  Check out the challenge blog Simon Says Stamp and Show for some amazing inspiration by the rest of the design team.   And every week, our amazing sponsor Simon Says Stamp has a $50 shopping spree to gave to a random winner.  Can't wait to see what you  make for the Flourish challenge!

Don't forget, here and here are two of my tutorials for making flowers from crinoline.  I have crinoline available in my Etsy store here.  Thanks so much for stopping by and for any comment you care to leave!
 

Saturday, June 18, 2011


After another super busy week, I'm back again for my Saturday Our Creative Corner post.  Lori Rider is our hostess again this week and this week she has a color challenge for us - but it's a color challenge with a twist - you have to use three punches and one of them has to be a border punch!


I kind of panicked when I saw the colors, but then I realized I had the Springtime Vintage paper pack from SU with those colors in it - whew!  I really love Soft Suede so I featured it quite prominently.  The doily lace is the white border lace doily that I sell in my Etsy shop.  I sprayed it with the homemade glimmer mist I use a lot (vintage photo reinker, water and Heirloom Gold Perfect Pearls).  I really love the way it looks with its new vintage paper look!  I did sponge the edges a bit with Vintage Photo ink too.

The three punches I used are all SU punches - two for the soft suede panel - the border punch and the corner punch.  The third punch is a large 5-petel flower that I punched newsprint with and placed it underneath my crinoline flower.  The rich razzleberry can be found in the two outer rosebuds and the regal rose is in the paper and the middle rosebud.  I colored white rosebuds with the reinkers, mixed with a few drops of water to mute the intensity.  That fabulous sentiment came from my favorite sentiment maker, Anne Vento.  Anne hosts the Sentimental Sundays Challenge Blog and you can pick up free digital sentiments every Sunday.  I sprayed the sentiment panel with a bit of my glimmer mist too.

You can find these items in my Etsy shop:
Venise lace rosebud appliques
White Paper Lace Doily
Shabby Crinoline Flowers
Crinoline to make your own shabby flowers - tutorial here

I hope you will stop by the Our Creative Corner challenge blog and see the beautiful creations by the other designers, and maybe play along with us this week too!

Thanks so much for stopping by - hope you have a great weekend@!
Blog Widget by LinkWithin


I changed my font at thecutestblogontheblock.com