This week with our challenge blog needing a guest designer, my team has nudged and cajoled me to fill the guest designer gap by creating a piece of artwork. WHOA! That’s not as easy as you would think. First I had to knock down the cobwebs that smacked me in the face when I opened my craft room door (figuratively, but still the first mental hurdle), then to clean up all the junk that I’ve been shoving in here (out of sight…ya know?). I spent two days getting reacquainted with all my craft supplies and filling up three waste baskets as I opened dried out jars and bottles.
After cleaning and organizing, I plopped myself down at the craft table and…ugh, now what? What do I do, where do I go for inspiration? I watched a few YouTube videos and went to The Funkie Junkie Boutique to shop. I messed around and played at my craft table for a couple of evenings, made a couple of tags for fun but threw them in the trash. Finally I went back to my frilly vintage roots and came up with something.
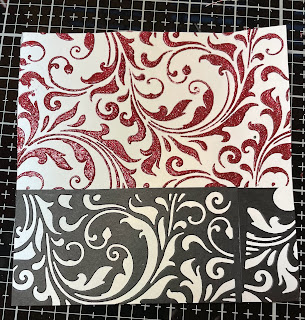
To start with, I wanted to use some sort of medium paste through a stencil. We just received a huge shipment from Prima Marketing with some great Jewel Effect glitter pastes. I wanted red for my Valentine’s make, chose Precious Rubies and used it with the Tim Holtz Layering Stencil THS032 Flourish. The paste is wonderful. It goes on smoothly and cleanly and dried in a couple of hours (even in the cold, rainy north Florida weather this week).
The stencil area only covered 2/3 of the area of my card’s panel, so I needed to fill in the rest. My mind was really trending toward red and black and I decided to coordinate the stenciling with a die cut. One of the great things about using Tim Holtz products is that many of the designs from product line to product line coordinate and work together. Tim’s Sizzix Thinlits Mixed Media #2 has a die that matches the stencil I used.
Using a piece of black card stock, I applied Sizzix Adhesive Sheets #656802 to the back and then ran it through my Big Shot. If you are not using this (or a similar product) when cutting your intricate dies, let me tell you, it is life changing. Being able to peel off the sticker backing and press down the die cut makes it not only effortless but allows for a perfect adherence. The die cut wasn't wide enough to fill the space so I had to piece it.
Now I needed a strip or ribbon to cover where the two panels joined. Searching my stash, I found just what I had in mind. Years ago, there was a Tim Holtz Idea-ology product called Deco Sheets and I found some left over glittery silver plus some glittery red from an unknown source. Pulling out my old Shape Strips Thinlits set 660226, I cut a strip of the silver and then backed it with the glittery red (bonus, a bunch of tiny silver glittery hearts). Digging through some set aside embellishments, I came across a flower that had been cut with the old Tattered Florals die plus a vintage looking sparkly heart that already had the attached “Love” charm in black! Why make something new when just the right thing jumps out and says “hey, give me some love too”?
Next, I needed a sentiment and riffled through all my old stamp sets. The one that really grabbed me was from Wendy Vecchi/Stampers Anonymous SCS131 A Passion For Art: "I never knew how much LOVE my heart could hold until I found YOU." It all seemed to come together with that sentiment.
I felt the card needed one more element, and sticking with the black and red theme, I cut a black heart using the Sizzix Impresslit Lucky Love 665227 (we still have a couple of these discontinued Impresslits left in the shop!). I very lightly burnished it with Prima Metallique Wax in White Pearl to give it the tarnished antique silver look. I'm a huge fan of the Prima Metallique Waxes. I love the way the black cardstock now looks like a heavily tarnished silver piece.
I hope you have enjoyed my return to blogging. I had a great time playing and creating. I just need to make time to do this at least once a month now that my craft room is functional again! Thanks so much for visiting!


3 comments:
Welcome back, getting to the craft table is the hardest step. This is and awesome Valentine, colours are perfect. Love your card.
I am so happy to see you back here! It must have been tough to get back into the groove. I miss your tags for Christmas. This card is really beautiful and the stencilling you created is perfect...not like mine usually is. I love the way the heart looks like pewter. Welcome back!!
Post a Comment