Wednesday, February 27, 2013

Extra! Extra! Sensational Paperboy Plate Released by Artistic Outpost


Today I'm honored to be taking part in the sensational February release for Artistic Outpost featuring amazing vintage photographs of "newsies" that were used as the inspiration for Artistic Outpost's newest release, Paperboy.  I am totally in love with this new plate so get ready because you will be seeing lots of samples from me putting it to use!
This collection features iconic newsboys and girls from the early 1900's when children hocked the latest news on the street corners of America's busiest cities. Also included are a newsprint collage, a megaphone for announcing the latest and greatest, and sentiments professing that "you are the hero in your own story".  The collection is available at Artistic Outpost in both unmounted sheets of red rubber for $14 or mounted on EZ Mount cling foam and pre-cut for you for $22.99. Mounted version comes with a cling card for easy storage.

Please stop by the blogs of the other Artistic Outpost designers to take in their stunning work with this fabulous new set.  


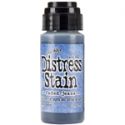
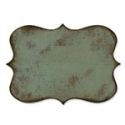
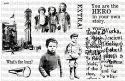
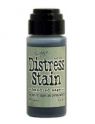
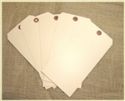
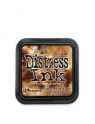
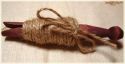
I've been seeing a lot of folded tags lately and decided to use one for my release sample.  Using one of the jumbo manila tags I sell at The Funkie Junkie Boutique, I sponged it heavily with Vintage Photo DI plus blended in a bit of Black Soot DI.  I also made a few ink blots on my craft sheet with Vintage Photo distress stain and blotted them up with the tag to create stain marks.  An aperture was cut with the Styled Labels M&S die and then the panel was stamped, front and back, in Sepia archival ink with the newsprint collage stamp from this plate.

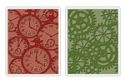
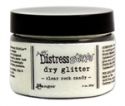
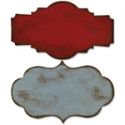
On the front, I created a frame by cutting chipboard with both the Styled Label and the Mini Styled Label M&S dies, ran it through the Riveted Texture Fade, then stained it with Vintage Photo DS.  When dry, I embossed it with Vintage Photo Distress embossing powder for a nice rusty look.
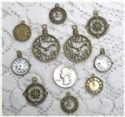
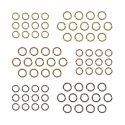
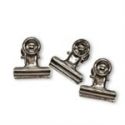
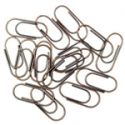
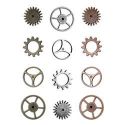
Inside I stamped the little newsboy and sentiments in Jet Black archival and used a stamp from the Loverly London plate, stamped in Sepia Archival ink.  To hold the folded tag closed, I used a hinge clip which I also embossed with Vintage Photo Distress EP plus a couple of gears strung together with Mini Paper Clips.  
I think I have covered all the details, but if you have questions, please feel free to email me or leave a question in the comments below.  Thanks so much for stopping by and for any comments you care to leave!


These products used to create this tag can be purchased at The Funkie Junkie Boutique:


Layering it On Again


Last week for the Frilly side of our Frilly and Funkie challenge, I didn't think I gave Sue's Layer it On challenge its due.  I felt like I didn't include enough layers.  So this week for the Funkie side, I totally layered it on and had a wonderful time with this FABULOUS new Paperboy plate just released by Artistic Outpost (and available now at The Funkie Junkie Boutique).

I even remembered to take a few photos as I created this piece.  I started with a piece of cardboard and gave it a good coat of gesso.
 Since my word was NEWS, the letters for which were cut with my Word Play die,  I googled vintage newspaper headlines and came up with a couple of images of newspapers which I printed on my home printer, sponged with Vintage Photo DI and adhered with matte multi medium.  Using Jet Black archival ink, I stamped images from Ephemera Backgrounds and Charles and Amelia, all news related.
I broke out one of the Dyan Reaveley stencils and used it to apply Faded Jeans and Vintage Photo distress stains.
I made three panels using the Ornamental die using white card stock that I glued to chipboard and then stamped with the newsprint collage from the Paper Boy plate.  Since I stamped it with Jet Black archival, I could then clear emboss it since the archival ink also serves as embossing ink.  Then I used Tim Holtz's rusted enamel technique on all three panels.  The panels were obviously sponged heavily with Vintage Photo and a little Black Soot.  The newsies were also stamped on white CS, trimmed out and then sponged with Vintage Photo.

I also incorporated a bit of a time element in this because I think news is time-sensitive.  And the turn-of-the century mechanical age brought Steampunk to mind so I used gears as my embellishment.  The gears were cut from gray chipboard, stained black with Black soot DS, dried with my heat tool and then I applied Brushed Pewter Distress Stain and a little Black Soot DS over that for the black grungy look and then dabbed a little Tarnished Brass DS on with my finger.  The clocks are also available at The Funkie Junkie Boutique.  I colored them with pitch black alcohol ink so they would coordinate well with all the other black on the piece.

So there you have it - my layered collage piece for the Layer it On and Share a Word challenge over at Frilly and Funkie.  Hope you will be joining in the fun with us for this challenge.  Please take time to stop by the other fabulous designers' blogs and leave them some love!


The following products used to make this collage are all available at The Funkie Junkie Boutique where Tim Holtz/Ranger products are always 20% below MSRP:

Saturday, February 23, 2013

Happy Birthday Paula!

Hello all you wonderful crafty people.  I hope your weekend is off to a sensational start!  I'm back today, just as I am every Saturday, to share my project for Our Creative Corner.  This week, Paula is our host again and we are celebrating her birthday.  And oh my goodness, she wants us to make her a cake!  That's right, layer upon layer and the decorations have to have to be red, blue and yellow.  

Well, I don't mind telling you that I was totally stumped on this one and a cake in red, blue and yellow was somewhat shocking to me - LOL.  I don't have any cake stamps so I decided I needed to actually build a cake.  So here is my three tier cake, which actually looks more like a wedding cake than a birthday cake.  I have to tell you that it definitely looks a lot nicer IRL than it does in this photo and I can confirm that I spent a LOT of time die cutting flowers!

The bottom layer consists of flowers cut with the Tim Holtz Tattered Flowers die.  The blue is weathered wood distress stain and they are all edged with Vintage Photo distress ink.  The middle layer was cut with the Tattered Florals Decorative Strip die.  The yellow is a combination of Antique Linen, a dash of Mustard Seed and a bit of Scattered Straw.  Antique Linen was too light, Mustard Seed was too bright and so I kept adding to my stain puddle on the kraft sheet until I got the color I was looking for.  The top layer was also done with the Tattered Flowers decorative strip die and the flower was colored with my new favorite color - Barn Door distress stain.  

I built this cake on the white corrugated cardboard that I sell in the store, but then decided to cut it out and make it a free standing piece rather than a wall hanging.  I'm really not satisfied with how it looks in the photo, but IRL this is a pretty cool piece.  

Thanks so much for stopping by and for all your lovely comments.  And do be sure to stop by for birthday cake at Our Creative Corner.  Happy Birthday Paula and many happy returns.  

I am also entering this into Tim Holtz's Tattered Florals challenge.  


These products can be purchased at the Funkie Junkie Boutique where Ranger/Tim Holtz and MElissa Frances products are always 20% below MSRP:


Blog Widget by LinkWithin


I changed my font at thecutestblogontheblock.com