Monday, April 30, 2012

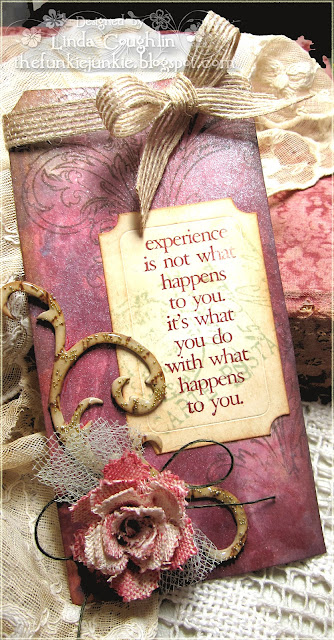
Marbled Stains Tag

Happy Monday!  I hope your week is getting off to a great start.  I decided to play in the Compendium of Curiosities 2 challenge #3, which is marbled Marbled Stains.  This week's Compendium challenge is sponsored by electric Paperie with a generous gift of a $25 gift certificate!  This technique is explained in Tim Holtz's Compendium of Curiosities #2 book on page 46.  This is my first attempt at this technique.  My two colors of stains were Aged Mahogany and Bundled Sage.  I tried it a couple of times and each time I increased the amount of Bundled Sage stain, but the Aged Mahogany seemed to obliterate most of the Bundled Sage each time.  You can just see a bit of it towards the top of this tag.  So it is a little darker and more intense than I intended.  I also added a couple of squirts of Perfect Pearls Perfect Pearl to liven it up a bit.  In retrospect, I think I should used much less Aged Mahogany and a lot more Picket Fence.  Oh well, practice, practice, practice - it's all good and it's all fun :)

Here's the process I followed to create this tag:
1) cut tag using the Tag and Bookplates die and Ranger Manilla card stock
2) perform Marbled Stains technique using Aged Mahogany, Bundled Sage and Picket Fence Distress Stains
3) spritz with 2 shots of Perfect Pearls - Perfect Pearl (you don't need much of this stuff, believe me!)
4) stamped Fabulous Flourish stamp with Gathered Twigs DI
5) cut ticket using Ticket Die and stamped with sentiment from Stuff to say in Aged Mahogany DI, overstamped with stamp from Mini Classics in Bundled Sage DI, sponged edges with Vintage Photo DI
6) created die cut flourish by adhering manilla CS onto chipboard, when dry cut with Elegant Flourishes, grunge up a bit and emboss 3 coats using Ultra Thick Embossing Enamel.  In last embossing drop a few gold micro beads into hot UTEE, adhere to tag with Claudine Helmuth's Multi Medium Matte
7) cut natural color canvas fabric with Tattered Pinecones die and colored with Aged Mahogany Distress Stain, dry with heat tool and roll into a rose.  Stained white tulle with Bundled Sage Distress Stain and gathered/tied with pice of green burlap string.  
8.  finished with bow of jute ribbon

Most of the products I used can be found my little on-line store The Funkie Junkie Boutique.  Just click the thumblinks to shop.  

Thank you so much for stopping by today and for any comment you care to leave.  I am so happy that people like looking at my work and hope that you have been inspired in some small way!


Other Challenges Entered
Corrosive Challenge Blog - Tim Holtz, The Man, The Myth, The Legend
The Order of the Opus Gluei - Use Flourishes on Your Project

Products Used:

Saturday, April 28, 2012

Butterflies for Mom!


Good Saturday morning to you!  As you can see, I am still hooked on butterflies.  These are alcohol inked and embossed.  I have a StepXStep over at Frilly and Funkie on how I made my enameled butterflies.

This week at Our Creative Corner, Anne Marie Hile is our hostess and she has a recipe challenge for us.   We are to make something for Mother's Day and our project must include ALL of the following:  Embossing - wet (heat) or dry, brads or buttons, ribbon and watercoloring.  I really stumbled on the watercoloring part of the challenge.  I had a watercolored panel ready to go, but I just didn't like it and no matter how I tired, I was not satisfied with how I worked it in.  So I tried a different approach - I did my watercoloring direct with a stamp by inking the stamp and then spritzing it with a mini mister.

I started with a sheet of that delish Pion Designs Fairytale of Spring paper and embossed it with the Flourish texture fade from the Damask and Regal Flourishes texture fades set, then sponged it a bit with Vintage Photo DI.  I cut another panel with the Styled Labels die from the back side of the Pion designer paper.  Using the floral silhouette stamp from Verve's Beacause of You set, I inked the stamp with Gathered Twigs DI and misted it with a min mister then stamped in onto the panel I had just cut.  The panel was sewn to the main panel with sort of a random zigzag stitch and I added two bronze floral corners that just seem to lend themselves to that die cut shape.

The enameled flower was cut with the new Tattered Flowers Decorative Strip die.  I cut bunches of those flowers last week, colored the white CS with Tattered Rose distress stain, spritzed with Perfect Pearls Biscotti and then coated with UTEE.  I did some with just the UTEE and Versamark and then later got out the Melting Pot and dipped the rest.  It's faster and less messy to use the Melting Pot, but I actually like the coating better when you do it by hand - the enamel coating using the melting pot is a little thicker and less delicate looking.  But doing it by hand with the Versamark and UTEE, I had to do two or three coats so it is a pretty tedious process doing it like that.

The hearts were cut from the white corrugated cardboard I sell in the boutique and then I used my alcohol ink applicator to apply Snowcap Mixative and Watermeloon alcohol ink - lighly and randomly. Then I rubbed the edges face down onto a distress emobssing ink pad and sprinkled on my hand mixed concoction of UTEE and gold EP to do a bit of thick random gold embossing.  The Mother's Day sentiment is from the same Verve set, stamped in Vintage Photo DI onto a piece of watercolor paper I had floating on my desk.  I just ripped it out and inked the edges.  The entire piece was sprayed very lightly with Biscotti Perfect Pearls mist - lightly because you don't want to saturate your paper or it will warp.

Thanks so much for stopping by today and for all of your wonderful comments.  Hope you will pop over to the Our Creative Corner challenge blog to see what the other designers have made for Mom.


Products used from The Funkie Junkie Boutique

Tuesday, April 24, 2012

Faux Patina Butterflies

 
Here I am back again for week two of the Frilly and Funkie challenge.  This is the week the Funkies share their interpretation of our challenge theme.  Anita Houston is our hostess and her challenge theme is RePurpose to UpCycle - a perfect theme for this Earth Day time of year.  I joined in with the Frillies last week with my altered Starbuck's bottle and really hadn't planned on making anything for the Funkie side this week, but I've had this candy box put aside for awhile now and thought it was time to get it out and repurpose it.
Plus I was on Linda Ledbetter's blog today looking at the Compendium of Curiosities challenge and just HAD to play along.  I had just received the exact alcohol inks in the boutique that the faux patina challenge required and it's a technique that I've been wanting to play with so away I went.  I had a bit of free time and decided to mess around and see how many ways I could create patinas on my sample butterflies.  Each and every one is made differently.  I am not going to do a step by step on how I made each sample, but if you have questions and what to know specifics, leave me a question in the comments and I will respond.  
Some butterflies are paper, some are acrylic packaging, some are Ranger metal foil tape and at least one is an aluminum pepsi can.  I also repurposed very heavy cardstock from a David Yurman catalog.  We get their catalogs periodically and they are very heavy, expensive paper.  I always grab them for my craft bin.  I used a variety of inks, acrylic paints and UTEE as well as alcohol inks in Pool, Meadow and Snow Cap Mixative.  I do have limited quantities of these alcohol inks available in the boutique ready to ship out immediately. 
I used a ton of different products, all available in the boutique.  They are listed below and you can just click on the thumbnail to take you to my shop listing.  One thing I would like to point out is that I used the Tim Holtz Terminology Tissue Wrap to cover the plastic insert to which I had given a coat of gesso.  I cracked open a brand new jar of Claudine Hellmuth's Multi Medium Matte, ripped the tissue wrap into strips and basically paper mâchéd it to the plastic insert using the multi medium.  The tissue wrap performed amazingly well!  It is very strong.  It didn't bunch up or turn into mush like normal tissue paper would have.  I just applied the multi medium with my fingers (I wore latex gloves to protect my hands) and then smoothed on each piece.  It took about an hour to cover the entire piece.  I let it dry, then sponged it with Vintage Photo DI and spritzed it with Perfect Pearls Heirloom Gold.  
I am linking this up to Linda Ledbetter's Compendium of Curiosities 2 Faux Patina challenge.  I have followed the technique that Tim Holtz describes in the Compendium II on page 58.  It's the first time I have done this technique and I must say it's awesome and I had a blast with it.  I will definitely be adding it to my favorite techniques!  I also wanted to say thank you to Angie Lentz for sponsoring the challenge and providing an amazing prize - some very lucky crafter will win a Tim Holtz autographed messenger bag!

Thanks so much for stopping by today.  Please be sure to stop by Frilly and Funkie and see the wonderful repurposed projects the Funkies have to show you!


Supplies Used from the Funkie Junkie Boutique:

Blog Widget by LinkWithin


I changed my font at thecutestblogontheblock.com