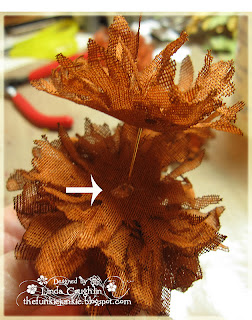
Hello, I'm back with you today to share how to make this lovely fall chrysanthemum out of crinoline.
Supplies Needed:
A piece of crinoline 3 inches x 35 inches or thereabouts (look for crinoline at your local sewing center. If you can't find it, I have a limited amount in my Etsy shop)
Tim Holtz Tattered Florals Die
Cuttlebug Dandelion die
Dye (I used a couple of drops of SU Really Rust with a dash of Chocolate Chip to darken it a bit)
Glue (I use Beacon Fabri-Tac)
Something to hold it together - a brad, a jewelry headpin (or you can glue it and put a decoration in the center such as a button or large rhinestone)
#1 Cut the Crinoline
You will need 5 crinoline flowers cut with the next-to-largest flower on the Tattered Florals die and 5 cut from the Cuttlebug Dandelion die. If you don't have these dies, substitute something similar (dies with long pointy petals will work best for this flower).
2. Dye your cut crinoline - follow dying/drying Steps 2, 3 & 4 in the sunflower tutorial.
3. Crumple each flower into a tight ball and then carefully unfurl them. A petal may pull off here and there but that should not be a problem. An occasional missing petal won't be noticed (arrows show where a couple of petals pulled off mine).
3. Using a jewelry headpin or a brad, start adding your flower layers from the top down. If you are using a button or a glue-on decoration for the center, it is easier to build from the bottom up as I showed in the sunflower tutorial. When building on a head pin, I add all five of the smaller flower layers first and then separate while still on the headpin and add a bead of glue every other layer.
4. Once you have all five layers added and the glue applied, push them up so all the layers are tightly compressed and using both hands, pinch the base of the flowers. You may feel some glue oozing out as you pinch. That's okay. You should end up with a compact base while the upper petals are in tight bud.
5. Now add all five of the larger flower layers and repeat the gluing process with a small bead of glue every other layer.
6. Push the remaining 5 layers all the way up so they are tightly compressed with the upper layers.
If using a head pin, bend it to a 45 degree angle and add a drop of glue so the flower layers can't wiggle off.
I glue a small circle as a cover over the head pin and when dry, using a wire cutter, clip off the excess.
7. All done - enjoy using your pretty fall flower on your fall crafting items. A word of caution about using it for apparel, the stamping re-inkers are not color fast. If you want to use it for apparel, I would advise using a color fast fabric dye and maybe sewing the layers together, although Beacon Fabri-Tac is made for gluing fabric.
I hope you found this tutorial helpful. If you have any questions, please post them in the comments section and I will respond to them at the bottom of this post so everyone benefits from the information.


16 comments:
Thanks Linda for another fab. tutorial I purchased some of your crinoline and have made some of the sunflowers so now going to try this one. I love how they turn out . Just love your blog I get so much inspiration from your work .
Marilyn
All of your flowers are absolutely beautiful, Linda... you are always such an inspiration.
Oh... and thanks for sharing the tutorials. I think I'm hooked on these.
yay!! be sure link this one on your etsy listings as well :)
Another fabulous tutorial, thanks for sharing :)
this is wonderful! thank you so much for sharing it with us! :)
These are fab flowers and thanks so much for sharing a tutorial, when I get some crinoline, I will definately have go!!your flowers are wonderful!!!! Trace x
Love them Linda - you are Queen of the Crinoline Florals! Thanks for sharing!
Hello Linda.
This tutorial will help many people as your step by step process is very easy to follow, I am sure we will be seeing many more of these dyed flowers on cards shortly.
Smiles:)
Well, you've wowed us again with your wonderful talent and such generous sharing. You'll probably start seeing some of these pop up on a few of my cards.
Gorgeous flowers. TFS
Beautiful, Linda!!! Thank you for sharing your technique - now to find my crinoline! lol
Linda, I have to tell you I tried your sunflower tutorial and I absolutely love them. Thanks for the easy to follow directions. I can't wait to try these, I have to go search for the cuttlebug die. Thanks again, Shari (cricutrookie)
That is a beautiful mum, Linda. Love it and also loved the tutorial! Thanks so much! I'll have to try one of those! You made it look easy. <3 Candy
Thank you for another wonderful tutorial! I love your beautiful flowers.
This is a great tutorial Linda, I'm always looking for new flowers. I'm checking with my local stores to see if they have Crinoline in stock.
I'd not thought of using the head pin, I never have known how to use them, for the center so another useful tip. Off to see the other flowers you've made using this.
Post a Comment