Monday, December 16, 2013

Challenge: 12 Tags of Christmas - Funkie Junkie Style - Week #12


Well friends, I'm here with the last of my 12 Tags of Christmas Funkie Junkie Style.  But that's not going to wrap it up for this year.  I know many of you hate to see the challenge end so I've created a bonus round for two more tags with a Thank You theme which will be published on December 23rd and December 30th.  And I have extended the deadline for all tags until January 8th.  If you finish all your tags/projects and meet the other requirements by January 8th, you will be in the random drawing.  I'm giving away 3 gift certificates - one for $50 and two more for $25 each.  Anyone who properly completes the challenge of the 12 tags by January 8th will receive a January coupon for 10% off at The Funkie Junkie Boutique but if you do the two extra thank you tags, your coupon will be for 15% off.  

Before the challenge closes, it would be a good idea to review the challenge requirements as I will be checking your posts to make sure you have included all the necessary information.  I will be looking for three things in each post:

1) a link back to my inspiration tag
2) a statement of what on my tag inspired your project
3) a link to my store The Funkie Junkie Boutique www.thefunkiejunkie.com which is sponsoring the challenge

And now that the business is out of the way, I'll give you a few details on my tag. I have been dying to use this Deco Christmas set by Tim Holtz but just hadn't been able to work it in for any of my DT commitments.   Normally I use a jumbo manila tag, but this time I wanted gold and white so I covered my manila tag with white CS.  Then I stamped the silhouette with Distress Embossing Ink and applied Queens's Gold embossing powder.  That's the first time I have used it and I really love the way it looks.  It's not as shiny as some gold EP and it has almost a gold foil look to it.  If you double click the image to get the largest close up, you can better see how it looks.  Then, using the Tim Holtz Stars stencil, I embossed some stars with Wendy Vecchi's gold embossing paste.  But I wasn't happy with the gold color - it didn't match the Queen's Gold EP so while the embossing paste was still wet, I applied the Queen's Gold EP to the stars and heated it up.  Because the embossing paste wasn't quite dry, it bubbled a bit and I really like the effect.  Next I stamped the greeting in Jet Black archival and inked the edges with Antique Linen DI.  I thought it looked a little bland so I applied a very little embossing powder to the edges and melted it on.  

I really liked what my friend Jenny did on her card with the Decorative Strip snowflakes, using them in small pieces rather than an entire border.  So I gold embossed mine and cut them into pieces.  I thought they worked rather well here.  

To finish it off, I glittered a large snowflake die with Antique Linen Distress Glitter and topped it off with a shabby seam binding bow and a jingle bell that I also embossed with Queen's gold (everything must match, right?).

And that's it for the first 12 tags.  Thanks so much for visiting and for playing if you are so inclined.  I'll be back next Monday with the first of the two Thank You tags.  Until then, enjoy this blessed season!


These products were used to make this tag.  They are available at The Funkie Junkie Boutique where Tim Holtz products and most other crafty goodies are always 20% under MSRP.

Sunday, December 15, 2013

A Very Vintage Christmas

Welcome!  I'm happy you are paying me a visit.  And a special welcome to all of my new followers.  I see I have a number of new visitors/followers this week, probably due to the 12 Tags challenge I have been running.  I hope you will enjoy visiting my blog as much as I enjoy creating the projects I share.

And now it's time for me to share the card I made for the currently running challenge over at Our Creative Corner.  A huge thanks to Laura for giving us a challenge theme that is so close to my heart. We are to create a vintage Christmas piece using only neutral colors...in Laura's own words "use a neutral palette....so think about shades of creamy hot chocolate, glistening white snow, rich dark sherry and mince pies, ivory candles, rustic wooden logs, roasting chestnuts and brown paper packages tied up with string!

This Christmas we want you to make anything you like - Cards, ATC's, Tags, Scrapbooking, journals, Gifts, Altered art......anything you like....but please use only neutral colours from ice white, through to ivory and cream, beige to dark brown and black. You can also use metal embellishments, metal paints and stains.

Please Note - Your creation does NOT have to be 'Vintage style' - We would love to see Christmas creations in any style, but please keep to a neutral colour scheme."
Can you see now why that made me so happy?  Completely my favorite style of creating!!  My problem was where to begin - I had so many ideas floating around it was hard to settle on just one.  I saw Tim Holtz's Frosted Film poinsettia recently and have been dying to try something with Frosted Film, but mine is not translucent as his was.  So I used that as a starting point imaging what it would like like in vintage browns.  I used a beautiful paper from Maja Design's It's Christmas Time and applied the Frosted Film, then cut it with the Tattered Poinsettia die.  After running it through the matching poinsettia texture fade, I inked the edges and high points with Vintage Photo DI.  That wasn't enough so I also went over the edges and high points with Tarnished Brass DS.  The bottom layer doesn't have frosted film, I cut a coordinating patten with the die, inked the edges and then stippled on Glossy Accents and applied Vintage Photo distress glitter in a random fashion.  A center of gold adhesive balls finished it off.
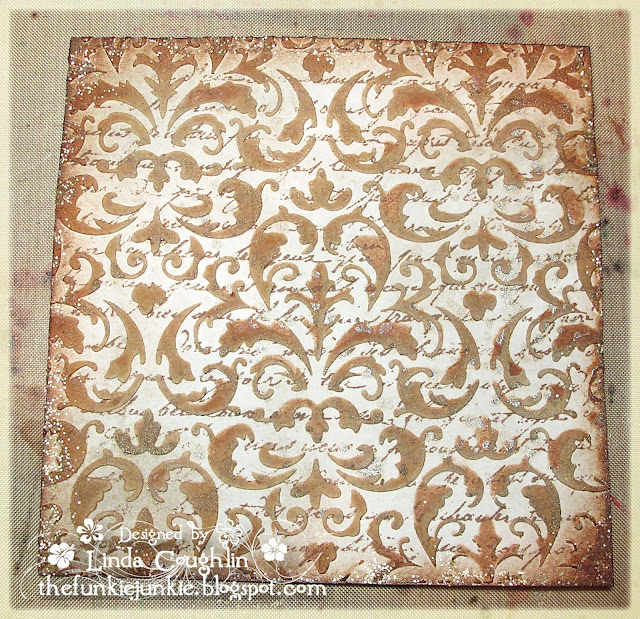
 Now I had my focal point, how was I going to use it?  I just got in some new Prima stencils in the store and grabbed the Flourish one and decided to make my own background for the card.  Starting with a square of white CS, I stamped a Wendy Vecchi script stamp in Potting Soil archival ink and then laid the stencil over the card stock.  I sponged Vintage Photo DI all over it and then leaving the stencil in place, I applied Wendy Vecchi's white embossing paste, going back over it several times with a credit card to smooth it out.  The white paste absorbed the vintage photo DI and not evenly - how cool is that?  I loved the way it came out.  Once dry, I spritzed some Heirloom Gold Perfect Pearls mist on my craft sheet and blotted the piece in it, drying it with my heat tool.  Still not enough bling so I randomly applied Antique Linen distress glitter around the edges.
On a roll now, I cut a garland from white CS, applied Vintage Photo DI and then applied Vintage Photo Distress Glitter.  The lace was dyed with boiled down (concentrated) coffee.  The banner was white CS, inked with Vintage Photo and swiped with Tarnished Brass distress stain.

That's it - I have to tell you I am head over heels in love this this card!  The poinsettia came out gorgeous and I'm still drooling over the stenciled embossing paste - really love the way it absorbed the color of the distress ink!

Thanks so much for stopping by today.  I hope you will stop by Our Creative Corner too and see the wonderful vintage Christmas projects from the rest of the team.


 The supplies below were used to make this card. They are available at The Funkie Junkie Boutique, where Tim Holtz and other name brand products are always 20% below MSRP.

Saturday, December 14, 2013

Wishing You a Joyeux Noel

Hi there,  I'm back with a card I made for my weekly DT post over at Artistic Outpost.  I haven't been making many cards lately and needed a bit of inspiration to get started to I headed over to Mojo Monday and grabbed their sketch.  

I used the yummy Maja Design It's Christmas Time paper to create the layout and then added a little Prima bling in place of the string shown on the sketch.  I cut a bauble with a Tim Holtz die and stamped the Father Christmas stamp from Snowy Woods in Potting Soil archival ink.  The holly is a Prima resin and the sentiment is also from Snowy Woods.  I stamped it in Jet Black archival on a banner cut with the Ribbon Flag die.  It was sponged lightly with Vintage Photo DI and then embossed with UTEE.  After melting the UTEE on, I sponged it heavily with Vintage Photo DI giving it the worn look.  I wrapped it up with a little rustic stitching.  

Thanks so much for stopping by and for all your lovely comments.  They always make my day!


The following supplies used to make this card are available at The Funkie Junkie Boutique where Tim Holtz and other name brands are always 20% below MSRP.

Blog Widget by LinkWithin


I changed my font at thecutestblogontheblock.com