Tuesday, February 15, 2022

A Belated Valentine

This is a big HELLO to friends near and far whom I haven’t been in touch with and who haven’t seen me crafting in several years. My craft room, tools and supplies have been gathering dust while I’ve been consumed with running The Funkie Junkie Boutique. From crafter to small business woman…it’s been a journey that hasn’t always been fun but has been interesting.

This week with our challenge blog needing a guest designer, my team has nudged and cajoled me to fill the guest designer gap by creating a piece of artwork. WHOA! That’s not as easy as you would think. First I had to knock down the cobwebs that smacked me in the face when I opened my craft room door (figuratively, but still the first mental hurdle), then to clean up all the junk that I’ve been shoving in here (out of sight…ya know?). I spent two days getting reacquainted with all my craft supplies and filling up three waste baskets as I opened dried out jars and bottles.

After cleaning and organizing, I plopped myself down at the craft table and…ugh, now what? What do I do, where do I go for inspiration? I watched a few YouTube videos and went to The Funkie Junkie Boutique to shop. I messed around and played at my craft table for a couple of evenings, made a couple of tags for fun but threw them in the trash. Finally I went back to my frilly vintage roots and came up with something.


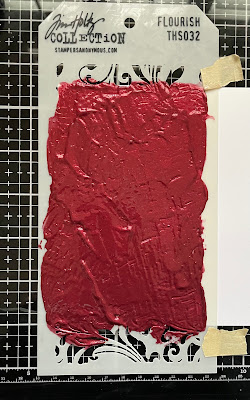
To start with, I wanted to use some sort of medium paste through a stencil. We just received a huge shipment from Prima Marketing with some great Jewel Effect glitter pastes. I wanted red for my Valentine’s make, chose Precious Rubies and used it with the Tim Holtz Layering Stencil THS032 Flourish. The paste is wonderful. It goes on smoothly and cleanly and dried in a couple of hours (even in the cold, rainy north Florida weather this week).


The stencil area only covered 2/3 of the area of my card’s panel, so I needed to fill in the rest. My mind was really trending toward red and black and I decided to coordinate the stenciling with a die cut. One of the great things about using Tim Holtz products is that many of the designs from product line to product line coordinate and work together. Tim’s Sizzix Thinlits Mixed Media #2 has a die that matches the stencil I used.


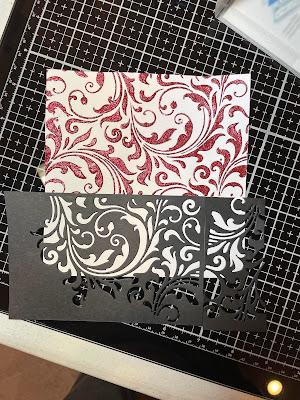
Using a piece of black card stock, I applied Sizzix Adhesive Sheets #656802 to the back and then ran it through my Big Shot. If you are not using this (or a similar product) when cutting your intricate dies, let me tell you, it is life changing. Being able to peel off the sticker backing and press down the die cut makes it not only effortless but allows for a perfect adherence. The die cut wasn't wide enough to fill the space so I had to piece it.


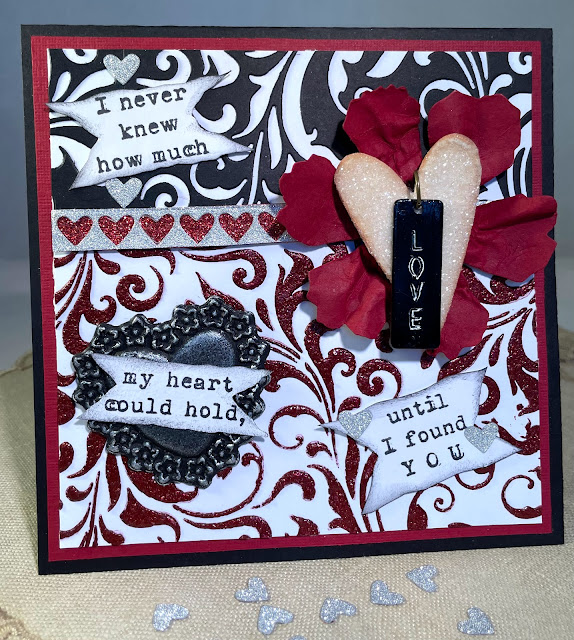
Now I needed a strip or ribbon to cover where the two panels joined. Searching my stash, I found just what I had in mind. Years ago, there was a Tim Holtz Idea-ology product called Deco Sheets and I found some left over glittery silver plus some glittery red from an unknown source. Pulling out my old Shape Strips Thinlits set 660226, I cut a strip of the silver and then backed it with the glittery red (bonus, a bunch of tiny silver glittery hearts). Digging through some set aside embellishments, I came across a flower that had been cut with the old Tattered Florals die plus a vintage looking sparkly heart that already had the attached “Love” charm in black! Why make something new when just the right thing jumps out and says “hey, give me some love too”? 

Next, I needed a sentiment and riffled through all my old stamp sets. The one that really grabbed me was from Wendy Vecchi/Stampers Anonymous SCS131 A Passion For Art: "I never knew how much LOVE my heart could hold until I found YOU." It all seemed to come together with that sentiment.


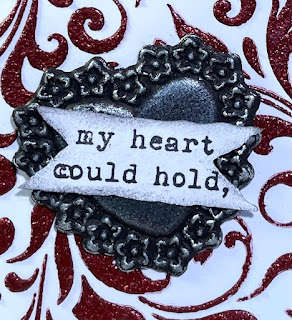
I felt the card needed one more element, and sticking with the black and red theme, I cut a black heart using the Sizzix Impresslit Lucky Love 665227 (we still have a couple of these discontinued Impresslits left in the shop!). I very lightly burnished it with Prima Metallique Wax in White Pearl to give it the tarnished antique silver look. I'm a huge fan of the Prima Metallique Waxes. I love the way the black cardstock now looks like a heavily tarnished silver piece.

I hope you have enjoyed my return to blogging. I had a great time playing and creating.  I just need to make time to do this at least once a month now that my craft room is functional again!  Thanks so much for visiting!

Wednesday, January 3, 2018

Wrap Up - 12 Tags of Christmas Funkie Junkie Style

Happy New Year everyone!  I hope you all had a blessed Christmas season.  It certainly whizzed by in the blink of an eye for me.  My apologies for the delay in getting the winners' post up.  We were out of town for a few days for Christmas.  I came back smack into the annual clearance sale at The Funkie Junkie Boutique and have been working overtime to get orders shipped out as quickly as possible.  We got caught up today and the boss (that's me, LOL) let me go home on time today!

Thank you so much to everyone who particpated  We had some amazing entries this year.  I'm very grateful that I didn't have to pick a winner!  I've sorted out the list of all those who qualified for the prize drawings and the 10% off in January coupon by completing all 12 challenges and providing all the required links on their posts.  Here are our qualifiers:

1. Mimi
2. Mitra Lee
3. Stefi
4. LauraVi
5. Lisa Bzibziak
6. Autumn
7. Suzz
8. Deb Ridell
9. Jane
10. Cec
11. Kate
12.  Sally Miller
13. Inkysplatters
14. Carol Stamps
15. Avril B
16. Lou
17. Sara Emily
18.  Butterfly
19. Wendy B.
20. Alison/Craftytrog
21. pearshapedchris
22. Mistletoe Home Decoration

We are giving away a $50 gift certificate and two $25 gift certificates to The Funkie Junkie Boutique. Here are the winners:

Grand Prize $50 Gift Certificate
Avil B.

$25 Gift Certificate
 Mitra Lee


$25 Gift Certificate 
Sally Miller

But actually you are all winners because we have a 10% off coupon for each of you to use in January.  Everyone, please contact Linda at customerservice@thefunkiejunkie.com for your gift certificate or coupon codes.

Thank you again to all my visitors and participants in this year's challenge.  It's always such a delight to have so many talented artists play along.  I hope you all enjoyed it as much as I did!


SaveSaveSaveSave

Monday, December 11, 2017

2017 Challenge: 12 Tags of Christmas - Funkie Junkie Style - Week #12

Double click to zoom in for details
Hello,

Welcome back to the final week of the 12 Tags of Christmas Funkie Junkie Style.  It's been another fun run this year with my annual challenge but it's now coming to an end. At this very busy time of year, my final tag this season is another quickie.  I actually had another tag partially made but when I sat down to finish it last night, I couldn't find the die I needed for the focal point.  My dies go back and forth from The Funkie Junkie Boutique to my home craft space because we use them at the shop to cut die cuts for our thank you gifts.  I wanted that dove die from a year or so ago and darn it, I searched high and low and couldn't find it.

At that point, I needed to start from the beginning again and sat at my craft table waiting for inspiration to hit.  Perusing the discarded bits and pieces strewn around the perimeters of my table, I plucked one here and another there and soon had a pile of options.  I grabbed a sheet of kraft core paper from this year's Christmas Stash pad, glued it over top of a jumbo manila tag and sanded the edges.  Then I laid out all the rejected elements I had rescued until I was pleased with the array.  It was all quickly glued down and in about 15 minutes I had a completed tag!  Not my most original piece, but a fun tag with a pleasing retro vibe.

So that's a wrap, my friends.  Thank you all for visiting and a most hearty thanks to all who played along this year.  If you are participating in the challenge, you have until midnight Eastern Time on December 29th to link up your submissions.  If you are participating, please review the challenge requirements found in my Week #1 post.  Before awarding the gift certificates and the 10% off January coupons, I do check to make sure all requirements were met.  It is very important that each post is linked back to this blog and also to The Funkie Junkie Boutique (www.thefunkiejunkie.com).

Wishing you all a blessed Advent season, a Merry Christmas and a Happy New Year!


The items below were used in making this tag and can be purchased at The Funkie Junkie Boutique.


Tuesday, December 5, 2017

2017 Challenge: 12 Tags of Christmas - Funkie Junkie Style - Week #11


Hello!  Welcome to week #11 of the 12 Tags of Christmas Funkie Junkie Style.  We are on a slippery slope here, on the downward slide to Christmas.  It's December 5th and we are almost at the end of my annual challenge.

This week I have an ultra simple tag to share.  My mojo went out the window this week and I really struggled.  In fact I had three partially made tags that were tossed aside because I was stuck.  Finally in desperation I whipped up this one.  It's not technique laden, but it has sort of a sweet retro look.

Starting with a jumbo manila tag, again this week I brushed it wth white gesso using a coarse stiff brush.  Using the Wendy Vecchi For the Holidays Stamp It Stencil It, I stamped the greenery using Library Green archival ink and then using the accompanying stencil, I sponged on Pine Needles DI.  Pine Needles DI was also applied using the Tim Holtz Merry Christmas stencil.  When the ink was dry, I used my finger and applied Prima Old Silver Metallique Wax to the edges.  Love the way it sinks into the brush marks.

A quick band was cut from last year's Tim Holtz Christmas Stash with a strip of narrow red burlap to top it off.  Using Festive Berries DI, the mitten stamp from Carved Christmas #1 was stamped on white card stock and cut out.  Quick embellishments were added - a piece of Christmas ephemera, a bit of red and white twine and a Christmas typed token.

Thank you to all who have visited and who have played along.  Time is running out, but you do have until December 29th to link up 12 Christmas projects inspired by my tags.  If you are new to the challenge, you can learn about it and its requirements in the Week #1 post here.


These products were used to make the above tag.  They are available at The Funkie Junkie Boutique where Tim Holt/Wendy Vecchi and most other name brand producs are always 20% below MSRP.


Tuesday, November 28, 2017

2017 Challenge: 12 Tags of Christmas - Funkie Junkie Style - Week #10


Tim Holt Tinsel stencil, Mini Paper Snowflakes, Sparkle & Christmas Stamp, BoBunny Glitter Paste, Prima Marketing Metallique Old Silver Wax
Double click any image to zoom in for details.

Welcome to Week #10 of the 12 Tags of Christmas Funkie Junkie Style!  My apologies for running a day late this week.  The Thanksgiving holiday just took me out of my routine, with family visiting and then trying to get the Thanksgiving weekend sale off the ground at The Funkie Junkie Boutique.  And I have to admit to dragging my heels a bit on posting #10 because I'm just not crazy about the way it turned out.  Although, it is growing on me.  I like it more today than I did yesterday - LOL.

It is definitely understated and doesn't make a comanding presence.  But once you begin to appreciate the sparkly glittery elegance of it, hopefully you will like it too.  Unfortunately, the camera can never capture the true sparkle of the original.

I recently discovered BoBunny's Glitter Paste when I read a post on Autumn Clark's blog about using it.  Wow, I knew then that I had to get my hands on it.  Fortunately one of my suppliers for the Boutique had it and I've stocked some in the Boutique.

I started with a blank jumbo manila tag and slatered it lightly with white gesso, then blended Vintage Photo distress ink over the entire tag.  Next I lightly inked the Sparkle stamp and randomly touched it to the tag.  I didn't want full coverage, but rather a worn look.  The die cuts were made from plain white card stock.  Once the background was created, the next step was to apply the Silver Glitter Paste through the new Tim Holtz Layering Stencil - Tinsel.

The bow was quickly colored with Festive Berries Distress Stain with the dabber top, so quick and easy to color with the dabbers.  I'm still annoyed that they have been discontinued.  The wreath and the sentiment panel were colored by blending Pine Needles on white CS and then spritzing with water.  All three pieces were rubbed with Prima Metallique Old Silver Wax (I'm addicted to that stuff!).


The snowflakes were cut from a manila tag that had been painted with white gesso.  Once cut, the Old Silver wax was applied lightly with my fingertip.  The large snowflake was made the same way but instead of wax, I applied Silver Stickles for a glittery effect.  The center of each snowflake was also embellished with Silver Stickles.  I had to settle for 'Winter Wonderland' as a sentiment.  I wanted 'Let it Snow'.  I searched every stamp set and die set I had for that sentiment and couldn't believe that I just don't have one!  The sentiment was silver embossed.

Here is one more shot of the tag on an angle which shows the shine a bit more.

Tim Holt Tinsel stencil, Mini Paper Snowflakes, Sparkle & Christmas Stamp, BoBunny Glitter Paste, Prima Marketing Metallique Old Silver Wax
Double click any image to zoom in for details.

Thank you so much for stopping by.  I so appreciate everyone who has visitied and especially those who have joined in the challenge.  If I haven't been by your blog yet to say hello and see your work, I will definitely try to stop by this week.  If you are new to this challenge, there are still four weeks to create and link up 12 tags or other Christmas/winter themed projects and qualify for the prize drawings and a 10% off coupon to use at The Funkie Junkie Boutique in January (on your pre-orders if you wish!).  You can find all the challenge details/requirements in Week #1 post here.


The products below were used to create the above tag.  They are available at The Funkie Junkie Boutique where Tim Holtz/Ranger and most other name brand products are alway 20% below MSRP.


Blog Widget by LinkWithin


I changed my font at thecutestblogontheblock.com