Monday, October 31, 2011

Country "Home"spun

Good Monday morning and a Happy Halloween to you!  Thank you for dropping by to see what I made this week for our Simon Says Stamp and Show challenge.  This week, we want you to show us a house.  You can put your own spin on the theme and you can be sure our fabulous design team members did just that.  Stop over at the challenge blog to check out their awesome art!

I had a few different ideas for this theme, but I wanted to wrap in all the things that a home means to us. Homes are very close to my heart right now because for the past three years I have been managing a food pantry/outreach ministry for my parish.  I see so many folks in jeopardy of losing their home or people that have already lost it.  The foreclosure rate in Miami is one of the highest in the nation and you don't have to be living on the street to be technically "homeless".  Many families have lost their homes and have moved in with family - some houses are bursting at the seams with the number of people residing there.  

With my piece, I explored the ways our homes support us.  I started with a larger-than-normal piece of cardboard (11x14" - I cut up a box to get it) and dry brushed it with gesso.  I used the Spellbinders Label #1 die to cut the houses, with a full piece for the structure and a half piece for the roof.  Each structure piece was stamped with a different Wendy Vecchi background stamp and I used her wonderful gingham stamp (from the Nature's Art set) with red ink for the roofs.  I also cut chipboard for each piece and adhered them to give extra dimension.  Additionally, when I adhered them to the cardboard, I used craft foam behind some of them to give a bit of different dimension to each house.  

Since my theme for the piece was "Home is Where the Heart Is", each house had to have a heart.  I cut the hearts from old vintage book pages and also a piece of chipboard for each with the Sizzix Hearts, Primitive #3 die, glued them together and then ran them through the Cuttlebug Textile EF.  After applying Vintage Photo DI liberally, I punched a hole in each and tied a scrap of the homespun type fabric to it.  I created tiny tag sentiments on my computer to describe all the things a home means to me:  family, love, friendship, comfort, security and support.  The houses still needed something so I cut some metal with the smallest flower from the Tim Holtz Tattered Florals die, added a tiny floral bead cap and a brad to each, but before I added the metal to the heart, I coated it with Ginger Alcohol Ink.  

My tin heart was cut with the largest heart in the Spellbinders die set from an aluminum pie tin.  I ran it through the Tim Holtz Checkerboard texture fade and dripped Ginger alcohol ink over it.  When it was dry, I sanded all the high points so the aluminum color showed through.  But I wanted the high points to be red and couldn't figure a way to do that without ruining the brown ink in the low points.  I ended up taking a paint brush and painting them with red re-inker.  


Thanks for sticking with me all the way to the end of this post!  Nows the time when I encourage you to stop by the Simon Says Stamp and Show blog to see what the other have created.  I can tell you that you will NEVER be disappointed by the line up over there.  Not to brag, but I think we have one amazing group of artists on that team. 

And of course, there is the support given us by our super generous sponsor Simon Says Stamp.  You need to go by their store and check out all the fabby crafting supplies.  And they are always super generous with prizes for our challenge, a $50 shopping spree at their craft-loaded store.  So whatcha waiting for?  Get busy building a house and share with us over at Simon Says Stamp and Show

Sunday, October 30, 2011

Crinoline Chrysanthemum Tutorial

Hello,  I'm back with you today to share how to make this lovely fall chrysanthemum out of crinoline. 

Supplies Needed:
A piece of crinoline 3 inches x 35 inches or thereabouts (look for crinoline at your local sewing center.  If you can't find it, I have a limited amount in my Etsy shop)
Tim Holtz Tattered Florals Die
Cuttlebug Dandelion die
Dye (I used a couple of drops of SU Really Rust with a dash of Chocolate Chip to darken it a bit)
Glue (I use Beacon Fabri-Tac)
Something to hold it together  - a brad, a jewelry headpin (or you can glue it and put a decoration in the center such as a button or large rhinestone) 


#1 Cut the Crinoline
You will need 5 crinoline flowers cut with the next-to-largest flower on the Tattered Florals die and 5 cut from the Cuttlebug Dandelion die.  If you don't have these dies, substitute something similar (dies with long pointy petals will work best for this flower).
2.  Dye your cut crinoline - follow dying/drying Steps 2, 3 & 4 in the sunflower tutorial.

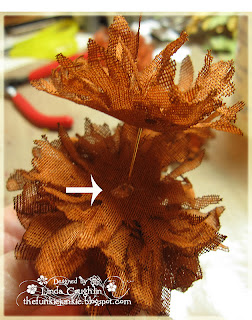
3.  Crumple each flower into a tight ball and then carefully unfurl them.  A petal may pull off here and there but that should not be a problem.  An occasional missing petal won't be noticed (arrows show where a couple of petals pulled off mine).  

3. Using a jewelry headpin or a brad, start adding your flower layers from the top down.  If you are using a button or a glue-on decoration for the center, it is easier to build from the bottom up as I showed in the sunflower tutorial.  When building on a head pin, I add all five of the smaller flower layers first and then separate while still on the headpin and add a bead of glue every other layer.


4.  Once you have all five layers added and the glue applied, push them up so all the layers are tightly compressed and using both hands, pinch the base of the flowers.  You may feel some glue oozing out as you pinch.  That's okay.  You should end up with a compact base while the upper petals are in tight bud.

5.  Now add all five of the larger flower layers and repeat the gluing process with a small bead of glue every other layer. 
6.  Push the remaining 5 layers all the way up so they are tightly compressed with the upper layers.  

If using a head pin, bend it to a 45 degree angle and add a drop of glue so the flower layers can't wiggle off.
I glue a small circle as a cover over the head pin and when dry, using a wire cutter, clip off the excess.

7.  All done - enjoy using your pretty fall flower on your fall crafting items.  A word of caution about using it for apparel, the stamping re-inkers are not color fast.  If you want to use it for apparel, I would advise using a color fast fabric dye and maybe sewing the layers together, although Beacon Fabri-Tac is made for gluing fabric.  
I hope you found this tutorial helpful.  If you have any questions, please post them in the comments section and I will respond to them at the bottom of this post so everyone benefits from the information.  

Saturday, October 29, 2011

Library Card Fold Christmas Cards


Happy Saturday.  Welcome to my post for Our Creative Corner.  I hope your weekend is off to a super start!  Our challenge theme this week at Our Creative Corner is Fancy Folds and it is brought to us by one of our newest design team members Tui Nathan.  Wow, did I ever struggle with this one.  It's been on my mind all week and I've been looking around for ideas, spent some time on SplitCoastStampers and actually had another project picked out.  But I just couldn't get going on it.  I ended up on  Mirkwood Designs looking for templates (just print it, trace it and cut it out) which is where I found this one for a library card pocket.  I decided to make a set of vintage image Christmas cards with the pocket. The tags measure 2 3/4 by 4 1/4 inches.  
Red is my favorite color and I just really enjoyed working on these little gems.  I'm going to list supplies rather than give a blow by blow of how I created this.  If you want more details, just ask.
Paper/CS:  Very Vanilla, Real Red, Cosmo Cricket "Hey, No Peeking"  Accessories: MS Snowflake border puch, Tim Holtz Rosette Die, red burlap from my Etsy boutique, White Venise Lace heart from my Etsy shop and painted red by hand.    Felt and Cuttlebug dies - Ice Crystal and Snowflakes #2, Crystal Effects, Buttons, border doily from my Etsy Boutique, SU embossing folder, red burlap thread from my Etsy boutique, red ric rac, PTI Button card die, Seam binding - hand dyed red.  

Images:  Vintage images from LunaGirl, Library Card from PaperTrey InkAfter I got the tag made, I realized that due to the embossing, there really wasn't much of a place to write or add a greeting.  So I thought it would be cute to actually make a library card (stamp from PTI) and affix it to the back of the tag to write on.  That sums it up for this challenge.  I sure hope you decide to join our challenge this week at Our Creative Corner.  Thanks so much for stopping by and have a great weekend!


Wednesday, October 26, 2011

Challenge: 12 Tags of Christmas - Funkie Junkie Style - Week #8


Another week has rolled around and I'm back to share my Tag #8.  If you are a new visitor to my blog, I'm doing a Funkie Junkie style 12 Tags of Christmas challenge and you are warmly invited to join in the fun.  There is still plenty of time to catch up.  You just need to have all tags completed by December 15th.  You can do any type of holiday project.  Full "rules" of the challenge are in this post.

Here's my tag for your inspiration for the Tag #8 challenge.  I'm not as happy with this one as I have been with the last two.  I stamped the Santa collage onto vintage muslin and then sort of quilted it by adding some stuffing behind it and sewing around the edges.  But I think he's a bit too puffy.  I may have to re-engineer him at bit.  For a fairly simple tag, I struggled about 3 hours with it.  My craft table is littered with rejected elements that I made and tried and didn't like.  The tag was stamped with the Whimsey Classified Ads stamp - this was inspired by one of our challenge participants - Kate with her wonderful newspaper background on her tag here.  The Santa is from the retired SU set Yultide Montage.  The Dec. 25th ticket is from SU's Winter Post set.

For the flower, I cut 3 layers of vintage muslin with the Tim Holtz Tattered Florals die and two layers of white vintage style crepe paper.  The tiny snowflakes were cut with a Cutlebug die from Very Vanilla paper.  I edged them just a bit with Vintage Photo DI and then double embossed them with UTEE to give  an enameled look.  That's pretty much the details.

Thank so much for stopping by and for your lovely comments.  I hope you will decided to play along with us on this challenge.


Monday, October 24, 2011

What? Just One Color???

Good morning and happy Monday to you all.  Thanks for stopping by to check out my weekly Simon Says Stamp and Show project.  This week we want you to show us your One Color.  This was a tough one for me.  I kept wanting to stray into adding another color so badly,  not that I don't like this vintage brown.  It just seemed like everything I reached for to add was another color.  So I'm not sure how I feel about this one although it is definitely loaded with vintage style embellies.    It's destined to be either a wall hanging or a jumbo refrigerator magnet.

I started out with a nice big piece of round chipboard.  I cut out a circle of the same size and cut it into quarters.  On each quarter panel, using Vintage Photo distress ink, I stamped a background stamp, one from each of these sets:  Wendy Vecchi's Nature's ArtLive and Make ArtBelieve in Art and Artistic Outpost's Ephemera Backgrounds. Then I sewed the panels back together with a zigzag stitch and glued it over the chipboard circle.  I ink distressed it up a bit with more Vintage Photo and then randomly gold embossed the outer edges.  The ruffle is made from kraft paper twist ribbon that I stamped the Christmas Carol music from Tim Holtz's Holiday Minis 3.  The paper twist was cut in a long strip, gathered and glued to the back to form a ruffle of sorts.

The doily was colored with Vintage Photo Distress Stain and the Santa from Tim Holtz's Holiday Minis was stamped in brown with Antique Linen Distress Stickles used on his holly leaf crown.  The snowflakes were cut from vintage book pages with an older Spellbinders snowflake die set and of course ink distressed with Vintage Photo.  The crinoline and the felt were cut with the Tattered Florals die.  

I hope you will stop by the Simon Says Stamp and Show challenge blog to see the amazing art projects my team mates have created.  And while you are there, grab some mojo and play along with us this week.  You might just be the lucky winner of the $50 randomly awarded shopping spree at Simon Says Stamp, courtesy of our very generous sponsor of the same name.

Thanks so much for stopping by today and for the very lovely comments that are left.
Challenges Entered:

Fashionable Stamping Challenge:  Coffee and Cream with a Hint of Dark Chocolate

Sunday, October 23, 2011

Crinoline Sunflower Tutorial

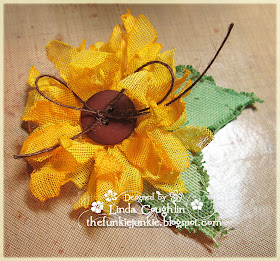
If you are a regular visitor here, you know I'm crazy about making flowers out of crinoline. I already have two tutorials on making crinoline flowers (here and here), but have had many requests for the three fall flowers I have made recently. This first tutorial is for making this sunflower.   Soon to be published tutorials will be on marigolds and on chrysanthemums.  You can enlarge the photos to see the details by clicking once and make them larger by clicking a second time.


If you can't find crinoline at your local fabric center, I have a limited supply available in my Etsy boutique here.

You will need:
Tim Holtz Tattered Florals die
Tim Holtz Tattered Leaves die
Yellow dye or reinkers
Green dye or reinkers
Something brown for the center - I like a button and brown burlap string
A 20 inch by 4 inch piece of crinoline
A small square of canvas for the leaves
Rubber gloves

Let's get started:
1.  Cut 5 flowers from the crinoline using the second largest flower on the Tattered Florals die.

2.  Mix your dye solution.  If I am making just one or two flowers, I mix my dye solution on my craft sheet.  If I'm doing a batch, I use a shallow bowl.  Here I have misted my craft sheet with water and dropped 3 drops of yellow reinker.  (all of the smaller brown marks are stains on my sheet - please disregard :).


Mix the water and the dye.  Wearing a rubber glove, I mix it with my hand.

Add more water or more reinker to achieve the strength of color you desire.  I often mix colors to achieve the shade of color I want.
3. Saturate your crinoline flowers in the dye solution.  Here you can see I didn't have enough dye solution so I quickly misted more water and added a couple more drops of reinker to fully saturate and color the crinoline.

4.  Let your flowers dry.  They will dry in a couple of hours.  Alternately you can dry them with your heat tool but don't get it too close or you will scorch the crinoline.


5.  Once dry, the crinoline will be nice and crisp again.  To give your flowers body, crinkle them up into a ball and then GENTLY unfurl them again.  This particular flower on my Tattered Florals die has a weak petal at the base and it frequently rips/falls off, especially during this step.  No worries, one missing petal will not be missed on the finished flower.


6.  Because this flower doesn't have a brad or pin, I glue the layers together from the bottom up.  (The arrow is pointing to where one of the petals fell off this flower).  The glue I use is Fabri-Tac by Beacon Adhesives.  Buy it at Jo-Ann's with your 40% off coupon!  It is also the glue I use for making my cards - no warping like water-based glue does.


7.  Continue gluing layers until all 5 are stacked and glued.


8.  Add whatever center piece you wish


9.  I used the Tattered Leaves die to cut leaves out of canvas and dyed them with a green reinker.  They ravel a bit, but I like the shabby look.  I glue two leaves together in a cluster and then glue the sunflower on top. 

All finished - a beautiful crinoline sunflower ready to embellish a special project.  Warning:  If using as a clothing embellishment, please be aware that stamping inks are not color safe.

I hope you found this tutorial to be helpful. If you have any questions, please leave them in the comments section here.  I will update the post with the requested information/clarification so all will be informed.

Thanks so much for stopping by and for any comments you care to leave.


Post Updates:
Reader's Question - what reinker did I use?  Here I used Stampin' Up's Daffodil Delight.  Sometimes I add a hint of So Saffron or a really tiny bit of Pumpkin Pie to mellow it out a bit.
Reader's Question - where can I buy crinoline?  Try your local sewing center.  If they don't have it, I do sell it in my Etsy shop here.  You can also try buckram, which might be more readily available.  It is heavier and stiffer than crinoline and generally about twice as expensive.  

Saturday, October 22, 2011

Let's Face It

Another week has come and gone and here I am again with my Saturday Our Creative Corner post.  Marjie Kemper is our hostess with the mostest again this week and her challenge for us is Faces.  She wants to see faces on our paper craft projects.    It might sound a little daunting, but it was actually very easy to find a subject.  I had it narrowed down to about four possibilities.   This one won out.  It's my absolute favorite Santa image.  I've used it in the past and will probably use it again.  I just love the color palette and the woodsy feel of it, which is why I pulled out the Distressed Stripes EF from Cuttlebug - nice and rustic.  Again this week I went to the Mojo Monday sketch to get me started.  I actually worked late on Friday night and hadn't even started a card for this challenge.  I had an idea using another image but tossed it aside at the last minute so I really was starting from scratch.  Using the sketch really simplified the project and made it pretty quick and easy.

For the distressed stripes, I used a cream colored paper called Naturals Ivory from SU and the bottom panel was stamped on the same paper with Ranger Jet Black Archival Ink using the Wendy Vecchi gingham stamp from her Nature's Art set that has become a favorite of mine.  I used a strip of wide, dark brown lace and dyed my seam binding with Vintage Photo distress ink to match all the ink distressing I did with the same ink.  The corner filigree is from my Etsy shop and I have been playing around with rusting it.  So this one is quite nicely rusted (I know, it's hard to see in the photo). I used an older Spellbinders die to cut the snowflake from the corrugated cardboard that is also sold in my Etsy shop.  Oh and the dark brown burlap thread in the button is also sold in my shop.

There you have it - another Our Creative Corner challenge met.  I hope you will stop by the blog to check out what the other designers have made.  We'd love to have you play along.

POST UPDATE:  Sorry I forgot to mention that the Santa image is from a Luna Girl vintage holiday CD that I have.  It's this set, which is pretty pricy, but worth every cent.  The images are clean and sharp and beautiful!

Hope you have a lovely weekend.

Wednesday, October 19, 2011

Challenge: 12 Tags of Christmas - Funkie Junkie Style - Week #7

Welcome back to my 12 tags challenge.  This brings us to Week #7.  That's right, we're more than half way through the challenge, although you still have almost two months to complete all 12 tags.  So if you haven't started yet, but would like to join in the fun, click here to read all the challenge rules.  We'd love to have you play with us!

First of all,  my apologies to those of you waiting for me to ship you a Fall Flowers kit.  I took the evening off to make a tag.  I was going to keep plowing on with the crinoline flowers and use a tag that I had already made, but I decided I needed a break from all the dye!  

I did a quick and easy background by stamping snowflakes from the Mini Holidays set in clear EP onto a vanilla tag base and then interspersed the branch and pine cone from the Mini Holidays 3 set and embossed with gold detail EP (does anyone know where I can buy more gold detail EP - mine is down to the dregs).  Then I sprayed it pretty liberally with my Vintage Photo glimmer mist and wiped the solution off the embossed stamping.  The edges were all ink distressed with Vintage Photo.  Then I cut a Spellbinders snowflake from the white corrugated cardboard that I carry in my Etsy boutique and the branch from the kraft corrugated cardboard.  I rubbed a bit of Vintage Photo distress ink on both pieces.  The snowflake was topped with one of the filigree snowflakes from my Etsy boutique and a resin flower from Stampin' Up.  

I took a paint brush and brushed a little gesso along the top sides of the branch and when dry applied a bit of Claudine Hellmuth Multi Medium Matte to the gesso and sprinkled on some vintage gold glass glitter.  The top snowflake was also cut with a Spellbinders die and embossed with Judi-Kins Egyptian Gold EP.  The tiny metal flower is from my Etsy boutique and the ticket is from Tim Holtz Odds and Ends set  

There you have it.  Thanks for stopping by and please feel free to email me or leave a comment if you have questions.  I'm always happy to share.  Hope you will decide to submit a piece of work for this week's challenge!